Before selling my late 2015 27″ iMac Retina 5K I wanted to secure erase its 1TB Fusion Drive consisting of a 24GB SSD and 1TB HDD. Secure erasing an HDD is simple enough using the Security Options in Disk Utility, but for Fusion Drives and SSDs this option is not available. To secure erase the iMac’s HDD I first needed to break the Fusion Drive into its constituent parts using Terminal.
A Fusion Drive is a logical volume group utilising Apple’s CoreStorage technology. Fusion Drives can be managed from the Terminal using the diskutil command followed by cs and the appropriate action. For more information on diskutil see man diskutil (8)
1.1 Breaking Apart a Fusion Drive
WARNING Despite the obvious intent of this article, breaking apart a fusion drive will delete all the data on both its constituent SSD and HDD whether you choose to subsequently secure erase the HDD or not.
The first step is to start your Mac in Recovery Mode or from a bootable macOS installer.
Information for Fusion Drive Macs Running macOS Mojave (10.14)
Since the release of Mojave, installing or updating macOS from an earlier version has forced startup Fusion Drives formatted as HFS+ to be automatically converted to APFS as part of the install process.
The instructions detailed in this article are only applicable to HFS+ Fusion Drives. However, they are still relevant when running macOS Mojave with an APFS-formatted Fusion Drive providing you first perform these extra steps:
IMPORTANT: Performing these steps will erase all the data on your Fusion Drive.
- Having started your Mac in Recovery Mode, open
Disk Utility. - In the top-left corner of
Disk Utility, click the View dropdown and select Show All Devices. The Mac’s startup Fusion Drive should be listed in theDisk Utilitysidebar:
Internal
Fusion Drive
Container disk 2 1
Macintosh HD - Select Container disk 2 in the sidebar and click the Erase icon in the toolbar.
- At the prompt, enter Macintosh HD for the Name – it will likely be pre-populated with Preboot – and select Mac OS Extended (Journaled) for the Format.
- Click the Erase button. Container disk 2 is deleted and the sidebar will show something similar to:
Internal
APPLE HDD ST1000DM003 Media
APPLE SSD AP0032H Media
Fusion Drive
Macintosh HD - Quit and then re-open
Disk Utilityto see the correct disk configuration:
Internal
Fusion Drive
Macintosh HD - Quit
Disk Utility.
1 The disk identifier may be another number.
At this point you have a Fusion Drive formatted as HFS+ and can continue with the steps in the remainder of this article.
Once started, open Terminal from the Utilities menu:
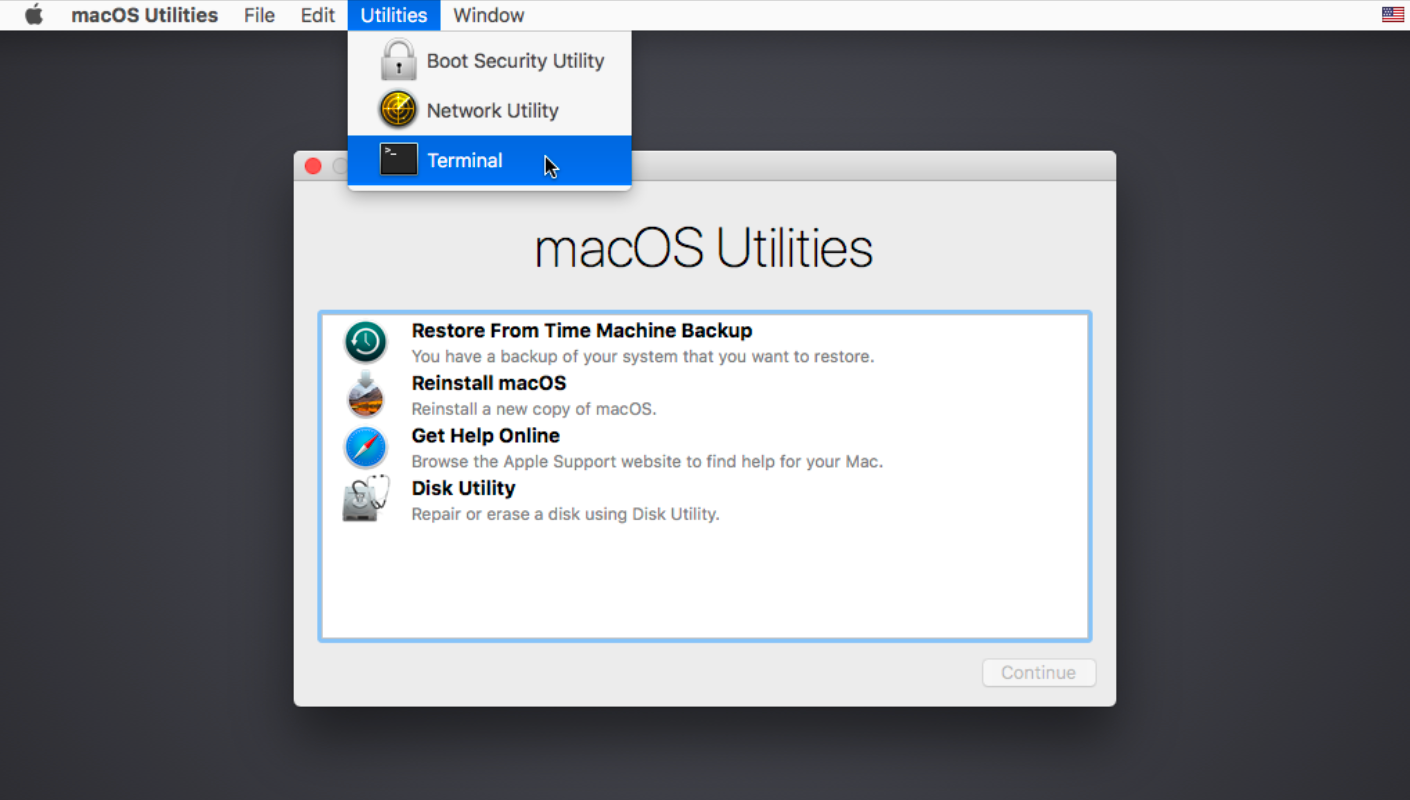
Opening Terminal from the Utilities menu in macOS Recovery Mode
WARNING A Fusion Drive is classed as a logical volume group in CoreStorage. However, other connected non-Fusion Drives – both internal and external – may also be displayed as logical volume groups. To ensure you’re targeting the correct one I would suggest ejecting or disconnecting any additional drives first.
To display details of a Fusion Drive, in Terminal type:
diskutil cs list
Information similar to the following is displayed:
CoreStorage logical volume groups (1 found)
|
+-- Logical Volume Group CE7D4BA0-BF9E-446F-83AC-8080A77D1AE4
    =========================================================
    Name:         Macintosh HD
    Status:       Online
    Size:         1022898851840 B (1.0 TB)
    Free Space:   45056 B (45.1 KB)
    |
    +-< Physical Volume 4542AE27-6EB3-41F9-AA09-9C0958CB669E
    |   ----------------------------------------------------
    |   Index:    0
    |   Disk:     disk0s2
    |   Status:   Online
    |   Size:     23553724416 B (23.6 GB)
    |
    +-< Physical Volume 9672F4CC-7B87-4460-ABE6-75F6954E7645
    |   ----------------------------------------------------
    |   Index:    1
    |   Disk:     disk1s2
    |   Status:   Online
    |   Size:     999345127424 B (999.3 GB)
    |
    +-> Logical Volume Family B8223BAC-CEFD-4851-8706-493F2B96AC8C
        ----------------------------------------------------------
        Encryption Type:         None
        |
        +-> Logical Volume 3BAEF8EE-B7F1-4094-88D4-58CECD811A72
            ---------------------------------------------------
            Disk:                  disk2
            Status:                Online
            Size (Total):          1021994074112 B (1.0 TB)
            Revertible:            No
            LV Name:               Macintosh HD
            Volume Name:           Macintosh HD
            Content Hint:          Apple_HFS
            LVG Type:              Fusion, Sparse
When breaking apart a Fusion Drive the two pieces of information needed are the logical volume universally unique identifier (UUID): 3BAEF8EE-B7F1-4094-88D4-58CECD811A72 and the logical volume group UUID: CE7D4BA0-BF9E-446F-83AC-8080A77D1AE4.
The logical volume needs to be deleted first followed by the logical volume group. Note the difference between the Terminal command for deleting the logical volume: diskutil cs deleteVolume and the command for deleting the logical volume group: diskutil cs delete.
1.2 Deleting the Logical Volume
As mentioned, the first task is to delete the logical volume. The Terminal command is diskutil cs deleteVolume logical_volume_uuid.
To delete a logical volume with a UUID of 3BAEF8EE-B7F1-4094-88D4-58CECD811A72, in Terminal type:
diskutil cs deleteVolume 3BAEF8EE-B7F1-4094-88D4-58CECD811A72
The following is displayed:
The Core Storage Logical Volume UUID is 3BAEF8EE-B7F1-4094-88D4-58CECD811A72
Started CoreStorage operation on disk2 Macintosh HD
Unmounting disk2
Removing Logical Volume from Logical Volume Group
Finished CoreStorage operation on disk2 Macintosh HD
1.3 Deleting the Logical Volume Group
Having deleted the logical volume, the next step is to delete the logical volume group. The Terminal command is diskutil cs delete logical_volume_group_uuid
To delete a logical volume group with a UUID of CE7D4BA0-BF9E-446F-83AC-8080A77D1AE4, in Terminal type:
diskutil cs delete CE7D4BA0-BF9E-446F-83AC-8080A77D1AE4
The following is displayed:
Started CoreStorage operation
Destroying Logical Volume Group
Erasing disk0s2
Initialized /dev/rdisk0s2 as a 22 GB case-insensitive HFS Plus volume with a 8192k journal
Mounting disk
Erasing disk1s2
Initialized /dev/rdisk1s2 as a 931 GB case-insensitive HFS Plus volume with a 81920k journal
Mounting disk
Finished CoreStorage operation
To confirm the Fusion Drive no longer exists, in Terminal type:
diskutil cs list
The following is displayed:
No CoreStorage logical volume groups found
At this point we can quit Terminal and secure erase the 1TB HDD using the Security Options in Disk Utility.
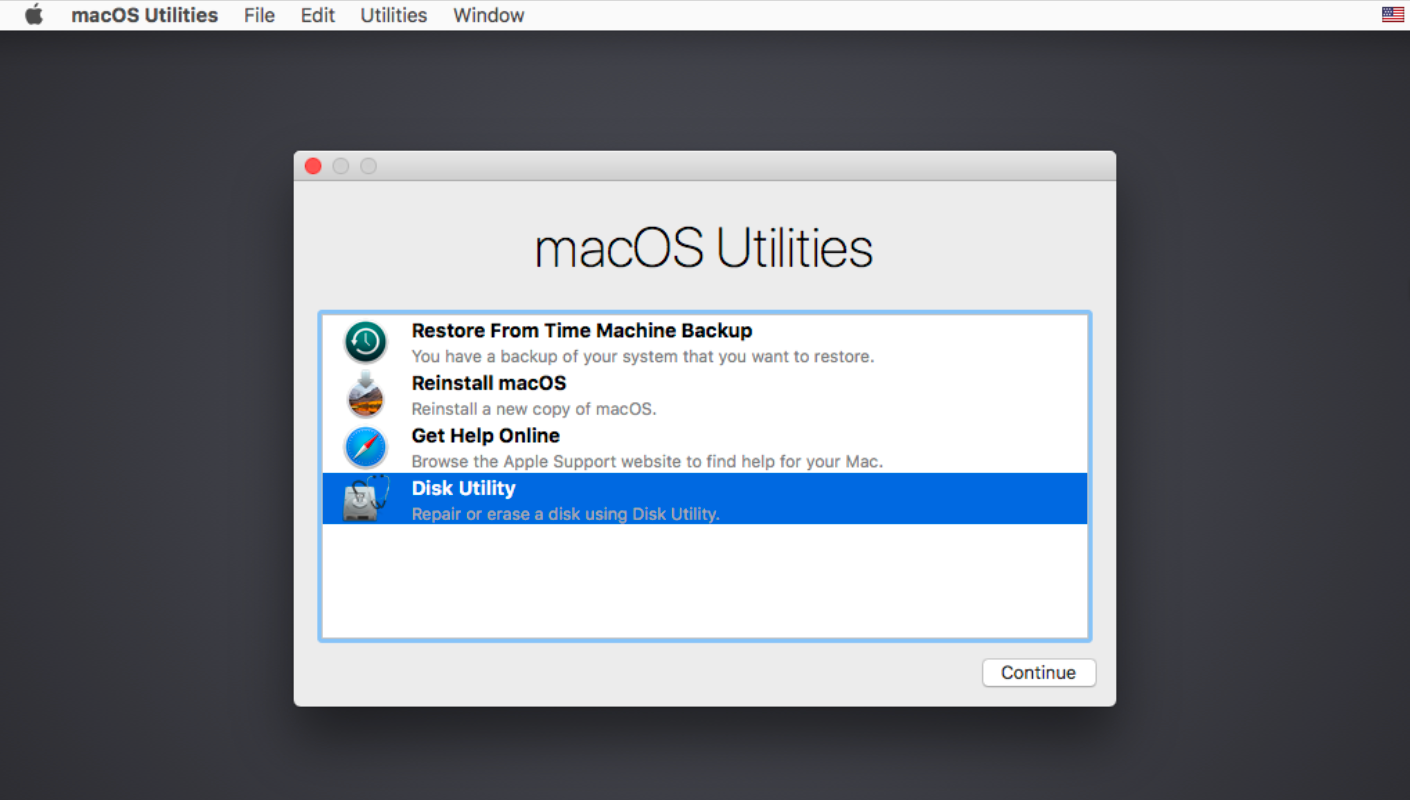
Opening Disk Utility in macOS Recovery Mode
Secure erasing an HDD involves erasing the drive and writing first random and then known data to the drive a specified number of times. There are 4 options ranging from the fastest to the most secure. The fastest option doesn’t securely erase a drive whereas the most secure and slowest writes to the disk 7 times and meets USDoD standards. Using the most secure option on my iMac’s 1TB HDD took around 12 hours to complete.
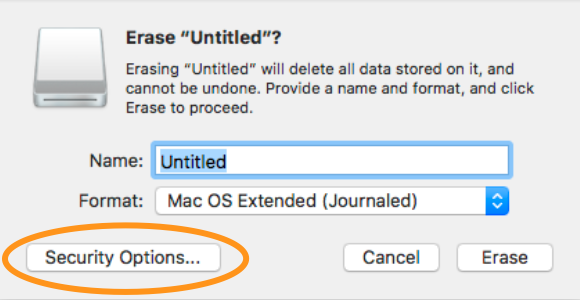
Selecting Security Options… in Disk Utility
NOTE: The Security Options button in Disk Utility is not available when erasing an SSD or Fusion Drive as it is not possible to secure erase either type of drive.
2.1 Creating a new Fusion Drive
Having deleted the existing Fusion Drive and secure erased the 1TB HDD, the final step is to create a new Fusion Drive. First we create a new logical volume group followed by a new logical volume. Note the difference between the Terminal command for creating the logical volume group: diskutil cs create and the command for creating the logical volume: diskutil cs createVolume.
2.2 Creating a new Logical Volume Group
The Terminal command for creating a new logical volume group is diskutil cs create logical_volume_group_name disk_1 disk_2. disk_1 and disk_2 are the device identifiers of the 24GB SSD and 1TB HDD respectively that can be obtained by typing diskutil list in Terminal. Be aware that your drives may have different identifiers to those shown below.
/dev/disk0 (internal):
   #:                     TYPE NAME               SIZE       IDENTIFIER
   0:    GUID_partition_scheme                     24.0 GB   disk0
   1:                      EFI EFI                314.6 MB   disk0s1
   2:                Apple_HFS Untitled            23.6 GB   disk0s2

/dev/disk1 (internal, physical):
   #:                     TYPE NAME               SIZE       IDENTIFIER
   0:    GUID_partition_scheme                     *1.0 TB   disk1
   1:                      EFI EFI                209.7 MB   disk1s1
   2:                Apple_HFS Untitled           999.3 GB   disk1s2
When creating a new logical volume group the SSD device identifier – disk0s2 – should be placed before the HDD device identifier – disk1s2. To create a new logical volume group with the name My Fusion Drive, in Terminal type:
diskutil cs create My\ Fusion\ Drive disk0s2 disk1s2
Note that spaces in the logical volume group name are escaped with a \. Alternatively, you can enclose the logical volume group name in double-quotes: "My Fusion Drive".
The following is displayed:
Started CoreStorage operation
Unmounting disk0s2
Touching partition type on disk0s2
Adding disk0s2 to Logical Volume Group
Unmounting disk1s2
Touching partition type on disk1s2
Adding disk1s2 to Logical Volume Group
Creating Core Storage Logical Volume Group
Switching disk0s2 to Core Storage
Switching disk1s2 to Core Storage
Waiting for Logical Volume Group to appear
Discovered new Logical Volume Group "385A33C7-D843-46A7-A022-E5B2D0A3BC1F"
Core Storage LVG UUID 385A33C7-D843-46A7-A022-E5B2D0A3BC1F
Finished CoreStorage operation
2.3 Creating a new Logical Volume
Having created a new logical volume group, the next step is to create a new logical volume. To do so we need the UUID of the logical volume group created in the previous operation: 385A33C7-D843-46A7-A022-E5B2D0A3BC1F.
The Terminal command to create a new logical volume is diskutil cs createVolume logical_volume_group_uuid type name size. To create a new logical volume as Journaled HFS+ with the name Macintosh HD for the logical volume group with a UUID of 385A33C7-D843-46A7-A022-E5B2D0A3BC1F, in Terminal type:
diskutil cs createVolume 385A33C7-D843-46A7-A022-E5B2D0A3BC1F jhfs+ Macintosh\ HD 100%
Note that spaces in the logical volume name are escaped with a \. Alternatively, you can enclose the logical volume name in double-quotes: "Macintosh HD"
The following is displayed:
Started CoreStorage operation
Waiting for Logical Volume Group to appear
Formatting file system for Logical Volume
Initialized /dev/rdisk2 as a 952 GB case-insensitive HFS Plus volume with a 81920k journal
Mounting disk
Core Storage LV UUID: 94B2CB6F-0BC4-49AA-9EFA-71011D0FCF24
Core Storage disk: disk2
Finished CoreStorage operation
To confirm the creation of a new Fusion Drive, in Terminal type:
diskutil cs list
The following is displayed:
CoreStorage logical volume groups (1 found)
|
+-- Logical Volume Group 385A33C7-D843-46A7-A022-E5B2D0A3BC1F
    =========================================================
    Name:         My Fusion Drive
    Status:       Online
    Size:         1022898851840 B (1.0 TB)
    Free Space:   45056 B (45.1 KB)
    |
    +-< Physical Volume 40470E54-2965-4EE4-BB1B-2DF77785AEF3
    |   ----------------------------------------------------
    |   Index:    0
    |   Disk:     disk0s2
    |   Status:   Online
    |   Size:     23553724416 B (23.6 GB)
    |
    +-< Physical Volume 31460DB0-7848-4A41-96CD-28EFCAF8DE71
    |   ----------------------------------------------------
    |   Index:    1
    |   Disk:     disk1s2
    |   Status:   Online
    |   Size:     999345127424 B (999.3 GB)
    |
    +-> Logical Volume Family 677C034A-3D8A-4552-ABB2-C90D09557436
        ----------------------------------------------------------
        Encryption Type:         None
        |
        +-> Logical Volume 94B2CB6F-0BC4-49AA-9EFA-71011D0FCF24
            ---------------------------------------------------
            Disk:                  disk2
            Status:                Online
            Size (Total):          1021994074112 B (1.0 TB)
            Revertible:            No
            LV Name:               Macintosh HD
            Volume Name:           Macintosh HD
            Content Hint:          Apple_HFS
            LVG Type:              Fusion, Sparse
While still in Recovery Mode we can now re-install macOS on the newly created Fusion Drive.
Thank you for your time and effort. Being a 25 year IT Admin it’s nice to get precise instructions like this.
Thanks so much for an awesome page. I had Monterey installed on my 2017 iMac (2TB fusion drive) and as some commenters observed many of the diskutil commands were unavailable for that version.
But, I was able to downgrade the macOS to El Capitan (which was the version available on Internet Recovery). And while in that recover mode, I accomplished all the steps you mentioned in this page
Steve –
I am having trouble following your instruction since I get an error when I try to create a new logical volume group – see as follows:
-bash-3.2# diskutil cs create My\ Fusion\ Drive disk0s2 disk1s2
Started CoreStorage operation
Unmounting disk0s2
Touching partition type on disk0s2
Adding disk0s2 to Logical Volume Group
Unmounting disk1s2
Touching partition type on disk1s2
Adding disk1s2 to Logical Volume Group
Creating Core Storage Logical Volume Group
Switching disk0s2 to Core Storage
A problem occurred; undoing all changes
newfs_hfs: MarkExtentUsed::pread(3, 0x7f8a56024000, 512, 4096): Input/output error
Mounting disk
Could not mount disk0s2 after erase
Initialized /dev/rdisk1s2 as a 26 GB case-insensitive HFS Plus volume with a 8192k journal
Mounting disk
Any suggestions? I have a mid-2017 iMac with a Fusion Drive. I performed a secure erase. I am using MacOS High Sierra 10.13.6 on an external drive to try to fix my Fusion Drive.
Thanks,
Scott
Hi Scott,
I’ve not seen the error message before and unfortunately I no longer have a Mac with a Fusion Drive to play with.
Not sure what to suggest, but was your drive formatted as APFS before you started this process and if so did you convert it to HFS+ beforehand as described in the article? Have you tried booting and proceeding with a macOS version later than High Sierra? Finally, there’s mention in the comments of diskutil resetFusion command. It may be of help.
Regards, Steve.
Great help
Hi there, great tutorial for which I thank you. I just wanted to ask; having secure erased the HDD and run the diskutil list command in Terminal, I got the expected display as detailed in your instructions. But there was also listed about 24 other “disk image” references below the device identifiers. Is this normal? Or do I need to delete these disk images as well?
Hi Craig,
While I don’t know what those additional disk images are, providing you target the correct SSD and HDD when rebuilding the Fusion Drive, I’d hazard a guess you don’t need to be worried about them.
Regards, Steve.
Hello Steve, thank you for a great article that helped me a lot.
I was just running this on my iMac Retina 5K from 2015 which has Mac OS Monterey installed and there were small differences in the process:
* Command “diskutil cs deleteVolume [..]” was not recognized and it is not needed anymore, instead…
* I used the “diskutil cs delete [..]” on the volume group and it was done.
* To re-create Fusion drive, I used “diskutil resetFusion” from terminal (https://support.apple.com/en-us/HT207584) and it worked fine. I’m reinstalling the OS now.
Sharing this for reference, as your article will surely find more use in the future.
今行ってくるね!
Thanks for the update Tomas.
To clarify, diskutil resetFusion is only available if macOS Mojave (10.14) or later is installed on the recovery partition. Use sw_vers | grep ProductVersion to check.
Regards, Steve.
Helpful step by step but I didn’t save the UUIDs so I don’t know what to do to create the new Fusion drive? What do I do?
Hi Erica,
The Logical Volume Group (LVG) UUID you need is created once you’ve completed step 2.2 CREATING A NEW LOGICAL VOLUME GROUP. If you’ve not completed that step yet, make a note of the new LVG UUID once you have. If you’ve already completed step 2.2, type diskutil cs list and the new LVG UUID should be included in the output: +‐‐ Logical Volume Group 385A33C7-D843-46A7-A022-E5B2D0A3BC1F.
Regards, Steve.
Fantastic tutorial, easy to follow and got the job done. Thank you so much!
thank you very much i’m still a beginner using mac but your post was very clear to understand!
One of the best guides there is on the internet.
FYI, as of any MacOS where APFS takes over the Fusion drive you can’t break the APFS volume and the options for secure erase are lost.
One work-around – if your system is old enough – is to boot it into a special network recovery mode where it uses the OS that the machine was shipped with. As long as it shipped with an OS prior to APFS then you’re good to go. To boot into this mode: hold down SHIFT-OPTION-COMMAND-R during boot and hold all 4 keys until you see the startup screen.
I was lucky: my iMac shipped with 10.10 – way before APFS. So it’s getting zero’d as I type this.
@Cyggy79
To break apart a Fusion Drive you need to be able to 1. boot your Mac from a drive other than the Fusion Drive you’re targeting AND 2. have access to the Disk Utility app. As such, any of the recovery modes should work regardless of the macOS version.
On two separate occasions I have recently broken apart a Fusion Drive having first booted the Mac using 1. Option-Command-R which allows you to install the latest macOS version compatible with your Mac (Big Sur in this instance) and 2. a macOS Big Sur bootable installer on a USB flash drive.
It’s true however, since macOS Mojave (10.14) startup drives formatted as HFS+ are converted to APFS as part of the install/upgrade process, but – as I describe in the article – this does not currently preclude you from subsequently breaking apart a Fusion Drive using any of the boot methods mentioned above.
Regards, Steve.
Sensational tutorial. I wanted to securely erase an iMac’s Fusion Drive in preparation for donation/resale and was surprised that I couldn’t do it the way I’d do it in Disk Utility with a SATA (non-Fusion) drive. Your tutorial saved the day. Thank you so much!
Thank you so much for this. The only thing missing was the size of the new volume at the end of the diskutil statement for the creation of the new volume. Terminal dialogue indicated what to do after the first failed attempt.
At 72 I found your guidance invaluable as I rebuilt the Fusion drive of the iMac of one of my neighbours – very easy to follow! Worked like a charm!
BTW my son spent a year in Kanazawa (high school) struggling with the Japanese language. Came home pretty much trilingual (French already there).
Thanks again Steve!
Thank you thank you thank you!!!!!
I couldn’t do a clean install on my iMac because the weird fusion drive wouldn’t erase all the way and these clear instructions fixed it! And it was my first google result!
Thank you so much for the step by step tutorial! lifesaver! Thank you!!!
Steve, may your dreams of fish and chips all come true. Thank you for posting these descriptive instructions. Life is looking better all the time. Arigatou Gozaimasu, Steve.
Dōitashimashite.
My friend, I am sure you have a profession requiring great reporting skills. This is a perfect procedure. I followed carefully letter by letter and completed it with zero mistake. That was a nightmare of me. Thank you very much sincerely.
Saved: Mac mini late 2012 fusion drive. 120 ssd and 500 hdd.
Problem: Boot camp assistant was impossible to install win 10 due to a corrupted dos partition.
(Ps: Isn’t a bootable flash disc better than recovery mode? I used a flash disc favoring the idea that if it needs to be deleted it must be in another platform)
It’s a well written article with very clear instructions, but the thing that confuses me is that I read the article while secure erasing the 1TB fusion drive in my MacMini.
It’s about 8% of the way through at the moment.
I found the article via a search, I was trying to get a rough idea of how long the erase would take – I’m using the quickest of the 3 secure options
It’s a 2014 Mac Mini running Sierra and the secure erase options show up just fine in disk utility in recovery mode.
I wonder if Apple changed something or if different macs are affected differently
@Andy,
Have just started my iMac with a 1TB APFS-formatted Fusion Drive running Mojave 10.14.5 in Recovery Mode. In Disk Utility the Erase option is greyed-out when I select ‘Fusion Drive’. When I select ‘Macintosh HD’, I can click Erase, but doing so doesn’t give me the ‘Security Options’ button. For an external non-Fusion Drive formatted as HFS+, I get the ‘Security Options’ button when I select Erase.
So in my case, it doesn’t appear that anything’s changed.
Regards, Steve.
Recently my 3TB Fusion Drive on my 2015 iMac 27“ started to massively corrupt files I could not recover in any way. The Mojave Update last year was done per clean install.
After many hours I was clueless, how to restore corrupted files, even copying my data to an external rendered the external drive useless. After every try I had to erase it again in recovery mode.
I found some hints that similar issues were effecting others running large fusion drives and Mojave.
Since my last clean install was not long ago, I decided I had to change the config somehow.
I stumbled across your manual and it thankfully guided me through the process of resetting the fusion drive, seperating it and putting it together again. Now I configured a 1 TB Fusion drive which I will use in APFS as before and a 2 TB data partition which I will run with HFS+.
I hope it will stabilize my system and give me greater security for the data on the second partition.
What do you think?
Thank you very much for your instructions!
Why doesn’t this work for me? I get to the first stage – diskutil cs list – and it comes back with: No CoreStorage logical volume groups found. I definitely have a Fusion Drive.
@Jemima,
I guess you must be running macOS Mojave and your Fusion Drive is formatted as APFS in which case these instructions are most likely not relevant. However, there are a couple of comments below from Eric Bousquet-Calle who found that diskutil resetFusion worked for him. His second comment maybe of particular interest to you.
Regards, Steve.
Thank you for your article, I found it educational and very helpful!
Hi,
Thank you for this complete tutorial.
Running around in circles for days trying to understand why my available disk space is constantly shrinking, I tried to restore my system yesterday night with no success. I have a 1.12 Fusion drive that, despite my erasing pretty much everything is now reduced to 125 gb available with a mystery “System” part taking up to 500 gb and nowhere to be accessible.
I found your post and am about to give it a try but wasn’t sure it’s apply to my case. I have Mojave latest update running and my drive is APFS formatted.
Do you think I can follow the same approach in such a configuration?
What about system re installation? Will the Mojave installer also re install the Recovery partition or will this be lost?
I hope my question makes sense.
Thank you again for your work and in advance should you be kind enough to get back to me.
@Eric,
My current iMac has an APFS Fusion Drive, but it’s no longer shown as a CoreStorage logical volume group so I suspect my instructions won’t work for APFS Fusion Drives.
I did however find this article by Apple, the second part of which – entitled “Using Internet Recovery” – appears to show how to break apart an APFS Fusion Drive and erase its constituent HDD and SSD. It then continues with how to create a Journaled HFS+ Fusion Drive. HFS+ Fusion Drives are automatically converted to APFS Fusion Drives when macOS Mojave is installed.
Two caveats: Firstly, the article refers to macOS High Sierra beta and may not be appropriate in your situation or for Mojave in general. Secondly, I’ve not tried it, so cannot say whether or not it works for APFS Fusion Drives under Mojave.
As with anything involving erasing your drives, always ensure you have at least one trusted recoverable backup beforehand.
Regards, Steve
Hi,
Thanks a lot for your kind feedback. I really appreciate your looking into this.
I continued digging after posting this question and stumbled on a page describing the diskutil instuction. Reading it I found an instruction I ignored, resetFusion.
In a word, it erases and resets to factory settings the Fusion drive, to HFS+ in my case.
I gave it a try and it worked like a charm (I had to do it twice actually as I made a mistake on my first Time Machine restoration).
I then used the Disk Utility tool to convert to APFS before the clean install as I suspected the automated conversion on Mojave update in September to be responsible for the mess. It worked smoothly and I successfully recovered 550 Gb of my Fusion Drive!!! There is no longer hidden / unaccessible “Other volumes” on my drive.
In case you’re interested and you accept external links in the comments, here is the page I found with all diskutil instruction. It may be a useful reference for others.
https://www.dssw.co.uk/reference/diskutil.html
Kind Regards,
Eric
@Eric,
Thank you. That’s the first I’ve heard of resetFusion in diskutil. This is the link to the updated man pages for diskutil you kindly provided. The same information may be accessed by typing man diskutil on the command line in Terminal.
Regards, Steve.
Thanks for article! Very helpful and clear.
One thing though? How do you securely erase the SSD, as the method you used to erase the HDD doesn’t actually permanently erase the contents of the SSD?
I tried Parted Magic and have had no luck, the program boots and recognizes the SSD, but doesn’t wake it on boot, there fore not allowing it be be wiped.
Not really sure what to do. The last thing I want to do is open this 2013 iMac up…
Thanks!
@Taylor S,
As you’ve realised, Disk Utility doesn’t allow you to erase an SSD because Apple have disabled that option for SSDs and Fusion Drives. I’ve heard reasons for this ranging from a standard erase makes it difficult to recover data from an SSD so why bother with a secure erase, to securely erasing an SSD doesn’t actually securely erase it and can reduce the SSDs reliability and longevity. That said, this article claims you can securely erase an SSD using Terminal, although I’ve never tried it. The article appears to have been written 3 or so years ago, but looks to have been updated recently in 2018.
Regards, Steve.
Thanks a lot Steve!! This is a great manual for the Fusion drive!
Jan
Thank you, very helpful!
Great tutorial, thanks for sharing this useful information!
Steve, thank You for this amazing list of instructions! I couldn’t find anything else that let me erase my fusion drive iMac storage memory.
Thank you very much for writing this down!
Clear and useful ! thank you Steve
Hi, couldn’t you just open Terminal from the recovery drive, type disk until secureErase 2 /dev/disk3 (or whatever is listed as the Fusion drive)? Curious…
@Phil,
Good point. I don’t believe you could target the Fusion Drive because it contains the SSD which – as far as I’m aware – can’t be secure erased. However, it may be possible to target the HDD directly without breaking apart the Fusion Drive. No idea how this would effect the stability of the Fusion Drive though.
Regards, Steve.
Thanks! This was really super useful, concise, and easy to follow the steps.
Everything worked beautifully except I couldn’t get Disk Utility to begin the erase. Selecting the HDD, Disk Utility kept trying to rebuild the Fusion drive and would not allow erase… only prompting choices to Fix or Ignore.
@Cris,
I didn’t experience Disk Utility trying to rebuild my fusion drive, but I have heard of it before. Not sure that it makes any difference, but I was using macOS Sierra at the time. Were you able to get it to work?
Regards, Steve.